Integrate Docker Images
If you need to extend this environment with your own containers or import additional data, please taken the following guidelines into account.
The following sections describe the necessary steps to integrate your own Docker images into the OneCX Local Environment. We will use a simple Hello World application as an example, consisting of a backend service, a backend-for-frontend (BFF) and a UI component.
- Steps to integrate your own Docker images
-
-
Prepare hosts file entries to access your services via the local proxy.
-
Create the required database and user in the Postgres container.
-
Prepare your Docker images for the services you want to add.
-
Prepare a Docker Compose file to define your services.
-
Starting your services
-
Add entries in hosts file
To access your Hello World service via the local proxy, add the following entries to your system’s hosts file:
127.0.0.1   onecx-hello-world-svc
127.0.0.1   onecx-hello-world-bff
Create Database and User
Before starting your service, create the necessary database and user in the PostgreSQL container (if they haven’t already been created).
You can do this either by connecting to the PostgreSQL container and executing the required SQL commands, or by using an SQL script, which is preferable for reproducibility.
-
Prepare SQL script
CREATE USER onecx_hello_world WITH ENCRYPTED PASSWORD 'onecx_hello_world';
CREATE DATABASE onecx_hello_world with owner onecx_hello_world;
GRANT ALL PRIVILEGES ON DATABASE onecx_hello_world TO onecx_hello_world;
GRANT ALL PRIVILEGES ON SCHEMA public TO onecx_hello_world;
As example the script is saved as
hello-world.sqlin the root of the OneCX Local Environment directory. -
Execute the SQL script
docker exec -i postgresdb psql -U postgres -d postgres < ./hello-world.sql -
Verify the database and user creation
docker exec -it postgresdb psql -U postgres -c "\l" docker exec -it postgresdb psql -U postgres -c "\du"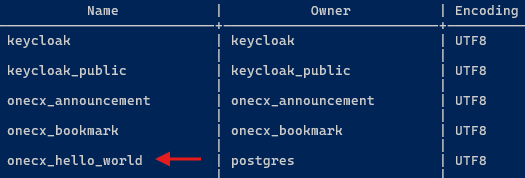 Figure 1. Database Verification
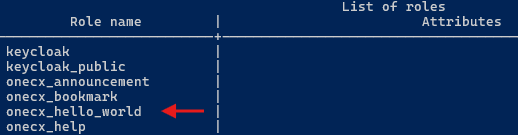 Figure 2. User/Role Verification
Prepare Docker Images
-
Build and tag your Docker images according to your versioning strategy. You can either use a local registry or build them locally for direct use.
-
Push your images to your Docker registry if necessary.
Prepare Docker Compose File
-
Create the file (e.g.
hello-world.compose.yaml), define your services with image references and tags, environment variables and health checks. -
Ensure that your file uses the same Compose project name as defined in the OneCX environment file to maintain network and volume consistency.
Compose Project Namename: onecx-local-env -
Add the OneCX Compose file that you want to use as the basis for inheriting existing service definitions and configurations. The easiest way is to use the file in the root directory of your local OneCX environment (compose.yaml).
Alternatively, you can reference the version-specific Docker Compose file (e.g.versions/v2/compose.yaml).Include OneCX Local Environment root compose fileinclude: - compose.yaml -
Place the file in the root of the OneCX Local Environment directory.
Here is an example of a Docker Compose file for the Hello World services
########################################
############## GENERAL #################
########################################
# IMPORTANT: use the same project name as the subsequent compose files using same network/volumes
name: onecx-local-env
# Align with the OneCX version-specific compose file
# ...so all OneCX services are known here
# ...this is not the case for environment variables!
include:
  - compose.yaml
########################################
####### ENVIRONMENT PRESETS ############
########################################
# Define common environment variable sets for services
# Requires corresponding variables to be defined in .env file
#
x-bff-variables: &bff_environment
ONECX_PERMISSIONS_ENABLED: ${ONECX_PERMISSIONS_ENABLED}
ONECX_PERMISSIONS_CACHE_ENABLED: ${ONECX_PERMISSIONS_CACHE_ENABLED}
QUARKUS_OIDC_CLIENT_CLIENT_ID: ${ONECX_OIDC_CLIENT_CLIENT_ID}
QUARKUS_OIDC_CLIENT_CREDENTIALS_SECRET: ${ONECX_OIDC_CLIENT_S_E_C_R_E_T}
QUARKUS_OIDC_CLIENT_AUTH_SERVER_URL: ${ONECX_AUTH_SERVER_URL}
QUARKUS_OIDC_AUTH_SERVER_URL: ${ONECX_AUTH_SERVER_URL}
TKIT_LOG_JSON_ENABLED: ${JSON_LOGGER_ENABLED}
TKIT_SECURITY_AUTH_ENABLED: ${ONECX_SECURITY_AUTH_ENABLED}
x-svc-variables: &svc_single_tenancy
QUARKUS_LOG_LEVEL: ${ONECX_LOG_LEVEL}
QUARKUS_OIDC_AUTH_SERVER_URL: ${ONECX_AUTH_SERVER_URL}
QUARKUS_OIDC_CLIENT_CLIENT_ID: ${ONECX_OIDC_CLIENT_CLIENT_ID}
QUARKUS_OIDC_CLIENT_CREDENTIALS_SECRET: ${ONECX_OIDC_CLIENT_S_E_C_R_E_T}
QUARKUS_OIDC_CLIENT_AUTH_SERVER_URL: ${ONECX_AUTH_SERVER_URL}
QUARKUS_DATASOURCE_JDBC_MIN_SIZE: ${ONECX_DATASOURCE_JDBC_MIN_SIZE}
QUARKUS_DATASOURCE_JDBC_MAX_SIZE: ${ONECX_DATASOURCE_JDBC_MAX_SIZE}
QUARKUS_DATASOURCE_JDBC_IDLE_REMOVAL_INTERVAL: ${ONECX_DATASOURCE_JDBC_IDLE_REMOVAL_INTERVAL}
TKIT_LOG_JSON_ENABLED: ${JSON_LOGGER_ENABLED}
TKIT_SECURITY_AUTH_ENABLED: ${ONECX_SECURITY_AUTH_ENABLED}
x-svc-multi_tenancy: &svc_multi_tenancy
<<: *svc_single_tenancy
QUARKUS_REST_CLIENT_ONECX_TENANT_URL: ${ONECX_REST_CLIENT_ONECX_TENANT_URL}
ONECX_TENANT_CACHE_ENABLED: ${ONECX_TENANT_CACHE_ENABLED}
TKIT_RS_CONTEXT_TENANT_ID_ENABLED: ${ONECX_RS_CONTEXT_TENANT_ID_ENABLED}
TKIT_RS_CONTEXT_TENANT_ID_MOCK_ENABLED: ${ONECX_RS_CONTEXT_TENANT_ID_MOCK_ENABLED}
########################################
############# Services #############
########################################
services:
########## ONECX HELLOWORLD
onecx-hello-world-svc:
image: ${DOCKER_REPO}/onecx-hello-world-svc:main-native
container_name: onecx-hello-world-svc
environment:
## Common OneCX environment variables
<<: *svc_multi_tenancy
## Hello World SVC specific environment variables
QUARKUS_DATASOURCE_USERNAME: onecx_hello_world
QUARKUS_DATASOURCE_PASSWORD: onecx_hello_world
QUARKUS_DATASOURCE_JDBC_URL: jdbc:postgresql://postgresdb:5432/onecx_hello_world?sslmode=disable
healthcheck:
test: curl --head -fsS http://localhost:8080/q/health
interval: 10s
timeout: 5s
retries: 3
depends_on:
keycloak-app:
condition: service_healthy
labels:
- "traefik.http.services.onecx-hello-world-svc.loadbalancer.server.port=8080"
- "traefik.http.routers.onecx-hello-world-svc.rule=Host(`onecx-hello-world-svc`)"
networks:
- onecx
profiles:
- all
onecx-hello-world-bff:
image: ${DOCKER_REPO}/onecx-hello-world-bff:main-native
container_name: onecx-hello-world-bff
environment:
## Common OneCX environment variables
<<: *bff_environment
## Hello World BFF specific environment variables
ONECX_PERMISSIONS_PRODUCT_NAME: "onecx-hello-world"
healthcheck:
test: curl --head -fsS http://localhost:8080/q/health
interval: 10s
timeout: 5s
retries: 3
depends_on:
onecx-hello-world-svc:
condition: service_healthy
labels:
- "traefik.http.services.onecx-hello-world-bff.loadbalancer.server.port=8080"
- "traefik.http.routers.onecx-hello-world-bff.rule=Host(`onecx-hello-world-bff`)"
networks:
- onecx
profiles:
- allPrepare Environment Settings
To keep the example simple, all necessary environment variables are either taken from the base Compose project (OneCX Local Environment) or defined directly in the Compose file (e.g. database username/password for backend services).
If you need to define additional environment variables (e.g. for image tags or database connection details), you can do so in a separate environment file.
If so then this file must be specified when starting the OneCX Local Environment using the --env-file option with Docker Compose.
Start Services
The relationship of the Hello World services to each other is defined wih the "depends on" settings in the Docker Compose file. Therefore, it is sufficient to start only the UI service, which will automatically start the backend services as well.
docker compose --env-file ./versions/v2/.env -f hello-world.compose.yaml up -d onecx-hello-world-uiOr if you have defined additional environment variables in a separate file (e.g. hello-world.env), you can start the services as follows:
docker compose --env-file ./versions/v2/.env --env-file ./hello-world.env -f hello-world.compose.yaml up -d onecx-hello-world-ui./list-containers.sh